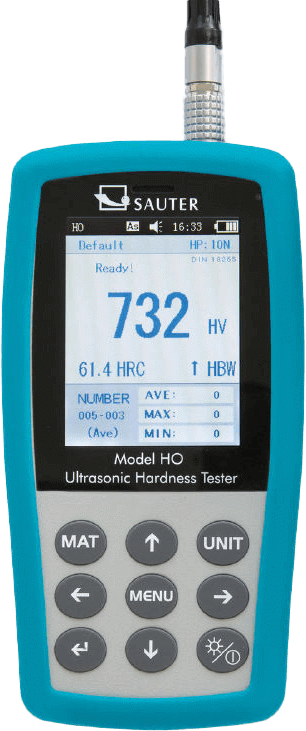
HO/HO-M Ultrasound Hardness Testing Device
Brand: KernHO/HO-M Ultrasound Hardness Testing Device
Brand: KernUltrasound Hardness Testing Device HO-M - Premium UCI hardness testing device for Rockwell, Brinell and Vickers with motorised probe for automated measurement processes.
Ultrasound Hardness Testing Device HO - Premium UCI hardness testing device for Rockwell, Brinell and Vickers
Features- Ultrasound Hardness Testing Device HO-M
- This range has identical product features to the SAUTER HO range, but is fitted with a motorised probe for automated measurement processes instead of the manual probe
- The motorised probe has a magnetic attachment ring which fixes it onto a magnetic test item securely. For non-magnetic test items, the motorised probe can be easily fixed by hand using the ergonomically-shaped attachment ring
- A motor inside the probe independently takes on the process of pressing the indenter into the test item, which helps to minimise incorrect use by the operator
- One-button function: the measurement process can be started with a single press of a button. Because it is particularly easy to operate, the user can carry out the most demanding hardness tests without a lengthy teach-in phase
- Virtually non-destructive testing: the resulting penetrations can only be seen under a microscope
- Short duration of measurement: only 2 seconds
- Higher accuracy and repeatability than with manual probes
- Particularly suitable for small, thin parts thanks to the automated test process
- Designed for parts with hardened surfaces because of the low penetration depth of the indenter
- Scope of supplies: 1 display device, 1 motorised probe, 1 transport case with standard accessories
- Ultrasound Hardness Testing Device HO
- Application: This ultrasound hardness testing device is ideally suited for mobile hardness testing, where the main emphasis is on obtaining rapid and precise results
- The SAUTER HO measures by using a vibrating rod which vibrates at ultrasonic frequency and is pressed onto the sample at a defined test force. At the lower end there is a Vickers indenter. Its resonant frequency increases as soon as an indentation is created when it comes into contact with the sample. Through appropriate adjustment of the device, the resulting change in resonant frequency is matched with the corresponding Vickers hardness
- Examples: The HO ultrasound hardness testing system is primarily used for measuring small forgings, castings, welding points, punched parts, casting tools, ball bearings and the flanks of gear wheels as well as for measuring the influence of warmth or heat
- Advantages compared with Rockwell and Brinell: Less test force and therefore only microscopic, small penetrations means that the testing is less destructive
- Advantages compared with Vickers: Demanding optical measuring is not required. You can therefore carry out measurements directly on-site, for example, on a permanently installed workpiece
- Advantages compared with Leeb: The high requirements for the weight of the test object are no longer required, in most cases
- Standards: The device fulfils these technical standards: DIN 50159-1-2008; ASTMA1038-2005; JB/T9377-2013
- Measurement data memory saves up to 1000 measurement groups each with 20 individual values
- Mini statistics function: Display of the measuring result, the number of measurements, the maximum and minimum value as well as the average value and the standard deviation
- The device can be set to both standard hardness test blocks and also to up to 20 reference calibration values. When doing this it is possible to measure different materials quickly, without having to re-adjust the device to the individual materials
- Scope of supplies: Display unit, UCI sensor unit, transport case, software to transfer the saved data to the PC, accessories
Specifications
Brand
Test Force
- 0.3 - 1 N
Attachment Ring Diameter
- 46 mm
Probe Length
- 198 mm
Test Item Minimum Weight
- 300 g
Test Object Minimum Thickness
- 2 mm
Surface Roughness of the Specimen
- RA < 5 µm
- RA < 3,2 µm
- RA < 15 µm
- RA < 10 µm
Displaying prices & availability for Ohio, United States in EUR. Change location or currency.
Models matching criteria: 8
In Stock
Approximate Lead Time
5 520,00 €
EUR
35,00 € Shipping
In Stock
Approximate Lead Time
In Stock
Approximate Lead Time
5 520,00 €
EUR
35,00 € Shipping
In Stock
Approximate Lead Time
5 520,00 €
EUR
35,00 € Shipping
In Stock
Approximate Lead Time
In Stock
Approximate Lead Time
5 520,00 €
EUR
35,00 € Shipping
In Stock
Approximate Lead Time
Documentation
Brochures
- Mobile Ultrasound Hardness Testing Device SAUTER HO Brochure (English) pdf 339 KB
- Mobile Ultrasound Hardness Testing Device SAUTER HO Brochure (French) pdf 351 KB
- Mobile Ultrasound Hardness Testing Device SAUTER HO Brochure (German) pdf 349 KB
- Mobile Ultrasound Hardness Testing Device SAUTER HO Brochure (Italian) pdf 340 KB
- Mobile Ultrasound Hardness Testing Device SAUTER HO Brochure (Spanish) pdf 342 KB
- Mobile Ultrasound Hardness Testing Device SAUTER HO-M Brochure (English) pdf 285 KB
- Mobile Ultrasound Hardness Testing Device SAUTER HO-M Brochure (French) pdf 278 KB
- Mobile Ultrasound Hardness Testing Device SAUTER HO-M Brochure (German) pdf 287 KB
- Mobile Ultrasound Hardness Testing Device SAUTER HO-M Brochure (Italian) pdf 249 KB
- Mobile Ultrasound Hardness Testing Device SAUTER HO-M Brochure (Spanish) pdf 254 KB
Certifications
Manuals
- Instruction Manual Ultrasonic Hardness Tester - SAUTER HO (English) pdf 601 KB
- Instruction Manual Ultrasonic Hardness Tester - SAUTER HO (French) pdf 610 KB
- Instruction Manual Ultrasonic Hardness Tester - SAUTER HO (German) pdf 611 KB
- Instruction Manual Ultrasonic Hardness Tester - SAUTER HO (Italian) pdf 605 KB
- Instruction Manual Ultrasonic Hardness Tester - SAUTER HO (Spanish) pdf 609 KB
- Reference Manual KERN Communications Protocol (KCP) pdf 1.8 MB


